aAlarm V4 : Intrusion detection with RaspberryPI and NFC
Overview
AAlarm is an alarm system.
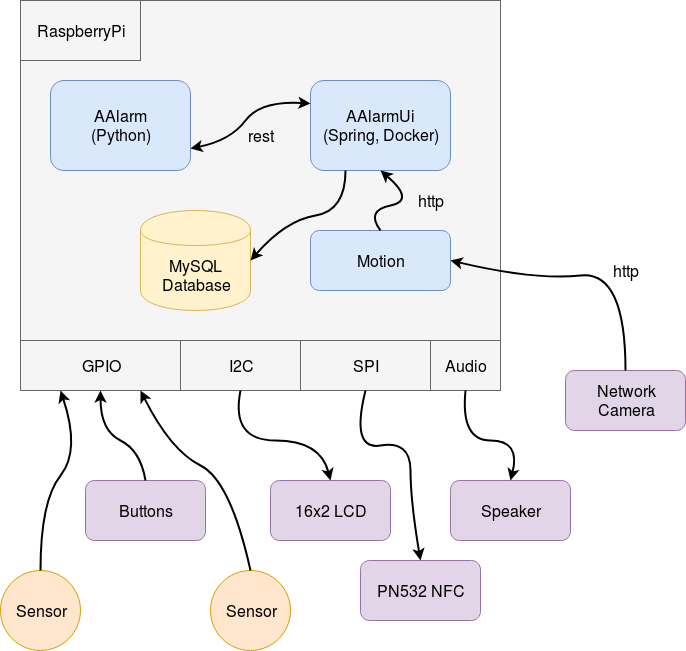
This 4th version is entirely based on RaspberryPi. AAlarm is NFC controlled (card or smartphone), sends alert mails, and links its events with a network camera motion detection. A web interface allows remote control.
|
AAlarm v4 is still under development, future updates will complete this post. |
Feel free to leave your comments at the bottom of the page.
Features
-
Sensors monitoring using GPIO
-
AAlarmUI : A web interface for remote control and events viewing
-
NFC : Activate or deactivate alarm using NFC cards or devices
-
LCD display
-
Security Camera : Using Motion
-
Alert Mail sending
-
Rest server : Remote control from AAlarmUi
-
Rest client : Send orders to Domoticz, send events to AAlarmUi
-
Sound notifications
-
Music playing when you’re out, to simulate presence
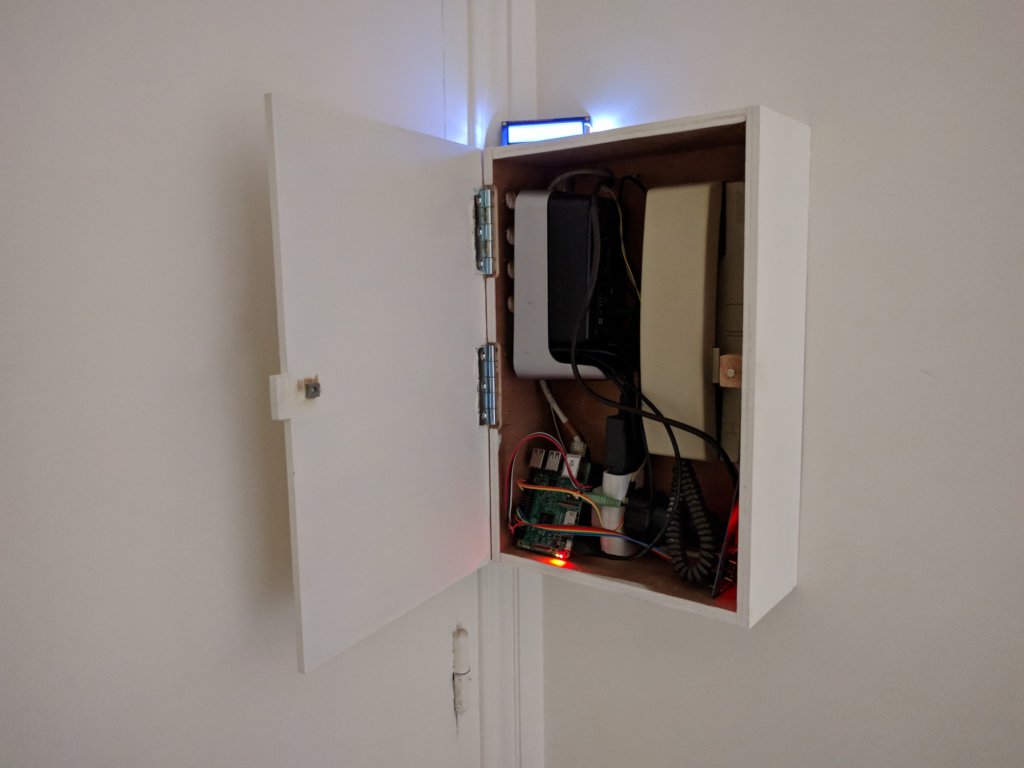
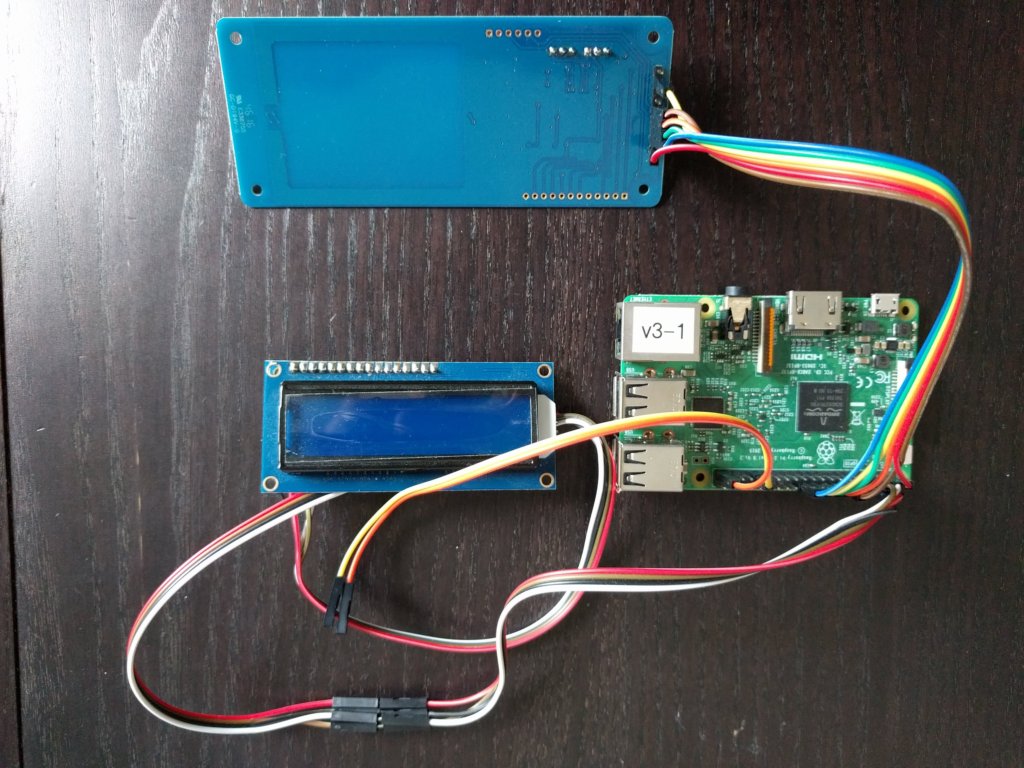
The big picture
Previous versions
In previous versions, Arduino was used as IO interface with sensors and keypad.
A serial link was used to communicate between Arduino and Raspberry PI, which was much more complicated.
Currently, Arduino is completly replaced by RaspberryPI GPIO functions.
Concepts
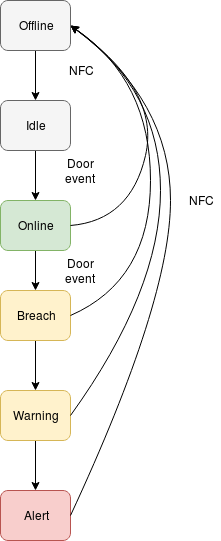
AAlarm life cycles involves states. States are like aalarm modes. Each state reprensent an alarm condition, switching between states is triggered by events.
States
| State name | Description | Trigger |
|---|---|---|
offline |
Alarm is disabled |
NFC, webui |
idle |
Alarm is waiting a sensor to trigger online state |
Door is closed |
online |
Alarm is enabled |
Door event, webui |
breach |
A critical sensor has been activated |
Door event |
warning |
A reminder before alert |
Time trigger |
alert |
Breach without alarm deactivation |
Time trigger |
|
In current version, only one sensor is supported in code. |
Events
NFC events
Passing a valid card near the NFC reader will toggle between offline and idle states.
Door events
Door sensor detects :
-
Close to Open as
closed_to_openevent -
Open to Close as
open_to_closeevent
| State name | Description |
|---|---|
open |
Door is open |
close |
Door is closed |
Depending of the current state, it may trigger online state or breach state.
WebUi events
Once logged, the user can force state toggling between online state and offline state.
Hardware
Parts list
LCD Display
Display useful reports from AAlarm monitor.
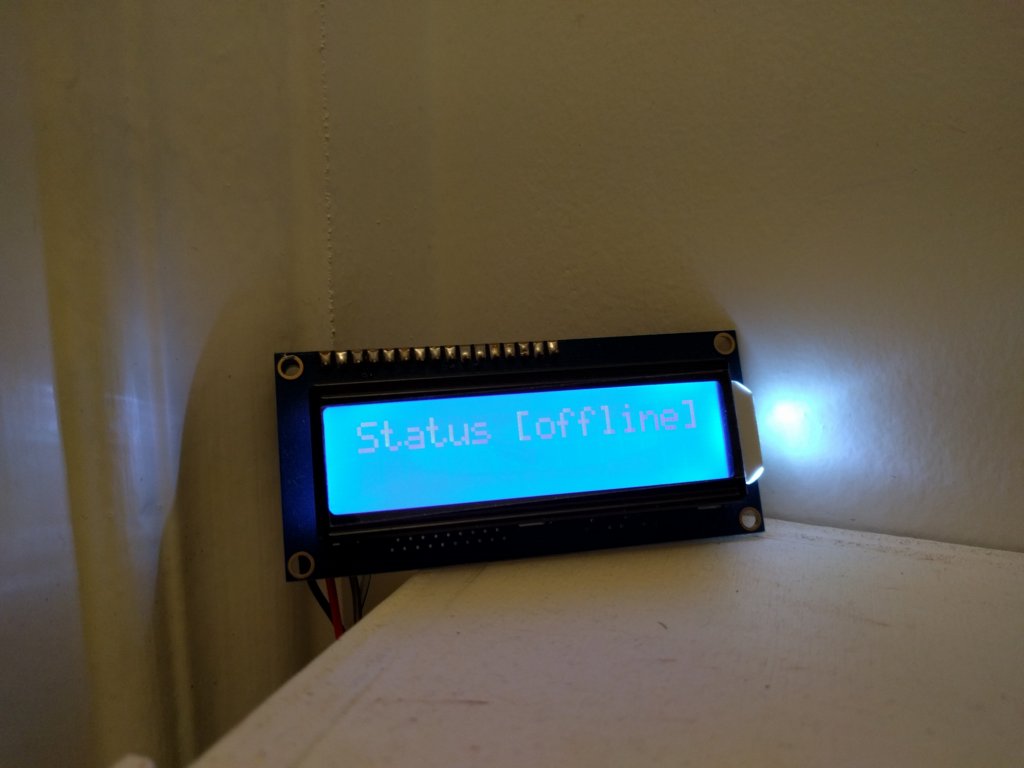
I’m using a 16x2 character from Adafruit. They also provide a backpack which allows i2c or SPI interface (We use i2c in this project).
Parts assembly
Either LCD, LCD backpack and NFC must be assembled and soldered.
Connect parts to RaspberryPI
PN532 NFC breakout
| PN532 | GPIO number | GPIO name |
|---|---|---|
SSEL |
12 |
GPIO18 |
MOSI |
16 |
GPIO23 |
MISO |
16 |
GPIO24 |
SCK |
22 |
GPIO25 |
3.3v |
1 |
3.3v |
GND |
20 |
GND |
i2c/SPI LCD Backpack
| LCD Backpack | GPIO number | GPIO name |
|---|---|---|
DAT |
3 |
SDA |
CLK |
5 |
SCL |
5v |
4 |
5v |
GND |
6 |
GND |
Inputs
| Input name | GPIO number | GPIO name |
|---|---|---|
door sensor |
31 |
GPIO6 |
button1 |
29 |
GPIO5 |
button2 |
33 |
GPIO13 |
button3 |
35 |
GPIO19 |
button4 |
37 |
GPIO26 |
Software
Install Raspbian
Download from official site Raspbian Jessie lite
Write image to sd card using linux dd or Windows using win32diskimager.
Raspbian configuration
Using sudo raspi-config :
-
Enable ssh
-
Enable i2c
-
Enable spi
You may have to reboot at this point.
Add your own USER and remove default pi user.
sudo adduser USER
sudo userdel pi
Then, add USER to required groups
sudo adduser USER sudo
sudo adduser USER gpio
sudo adduser USER spi
sudo adduser USER i2c
sudo adduser USER audio
Third party applications and librairies
mpg123
sudo apt install mpg123Python3 and Virtualenv
sudo apt-get update
sudo apt-get install build-essential python-dev python-smbus python-pip
sudo apt-get install -y python3 python3-pip python-devpip install virtualenv
sudo apt-get install python3
virtualenv -p /usr/bin/python3 py3env
source py3env/bin/activatePython libs
pip3 install rpi.gpiopip install ConfigParserclone https://github.com/kemkem/Adafruit_Python_CharLCD.git
cd Adafruit_Python_CharLCD
git checkout i2c_backplate_backlight
python setup.py installcd Adafruit_Python_GPIO
python setup.py installcd Adafruit_Python_PN532
python setup.py installpip install FlaskMotion
target_dir /mnt/cam/
on_picture_save /usr/bin/curl -u admin:PASSWORD 192.168.0.21:8080/motion/create?captionFilename=%f
Install AAlarm4
Written in Python, AAlarm monitor is the main software component.
Get AAlarm4
Configure AAlarm4
[nfc-keys]
keys=key1,key2
key1=<NFC_KEY_SAMPLE1>
key2=<NFC_KEY_SAMPLE2>

[domoticz]
login=<DOMOTICZ REST LOGIN>
password=<DOMOTICZ REST PASSWORD>
sceneLeave=<DOMOTICZ URL TO CALL WHEN SET ONLINE>
sceneEnter=<DOMOTICZ URL TO CALL WHEN SET OFFLINE>

[mailer]
recipient=<EMAIL RECIPIENT>
sender=<EMAIL SENDER>
subjectPrefix=<SUBJECT PREFIX>
stmpHost=<SMTP HOST>
stmpPort=<SMTP PORT>
login=<SMTP LOGIN>
password=<SMTP PASSWORD>

[timeout]
warning=5
alert=15
Run AAlarm 4
source py3env/bin/activate
cd py3env/aalarm4
python aalarm.py

nohup python aalarm.py &
Install Docker
Configure
Edit src/main/resources/application.properties
# admin user (aalarmui)
auth.user.login=<ADMIN_LOGIN>
auth.user.pwd=<ADMIN_PWD_ENCODED>

# path to motion path captions
motions.path=<MOTION_IMAGES_PATH>

# monitor logins
remote.user=<AALARM_LOGIN>
remote.password=<AALARM_PASSWORD>
Build
FROM openjdk:8
RUN mkdir /conf
COPY . /usr/src/myapp
COPY application.properties /conf/
RUN mkdir -p /cam
RUN mkdir -p /db
WORKDIR /usr/src/myapp
CMD ["java", "-Dspring.config.location=/conf/","-jar","aalarmui-0.0.1-SNAPSHOT.jar"]
Run Docker
docker run \
  -d -h aalarmui --name aalarmui \
  -p 8080:8080 \
  -v <PATH_TO_MOTION_CAPTIONS>:/cam \
  -v ~/docker-java/db:/db kprod/aalarmui
AAlarmUi will be accessible from http://<RPI_IP>:8080