Intrusion Alarm with Arduino, RaspberryPi and a motion detection camera
aAlarm Project Overview
What’s aAlarm ?
AAlarm is an alarm system builded with Arduino.
It’s capable of detecting various events, depending on connected sensors.
In its current version, it’s also using a RaspberryPi to run controlling software.
This version features a Debian package for easier install. But it’s still unperfect, as some feedbacks in comments show it :(.
New version
Previous versions
Features
-
Multiple event detection (Door sensor, Motion sensor, Gas sensor…)
-
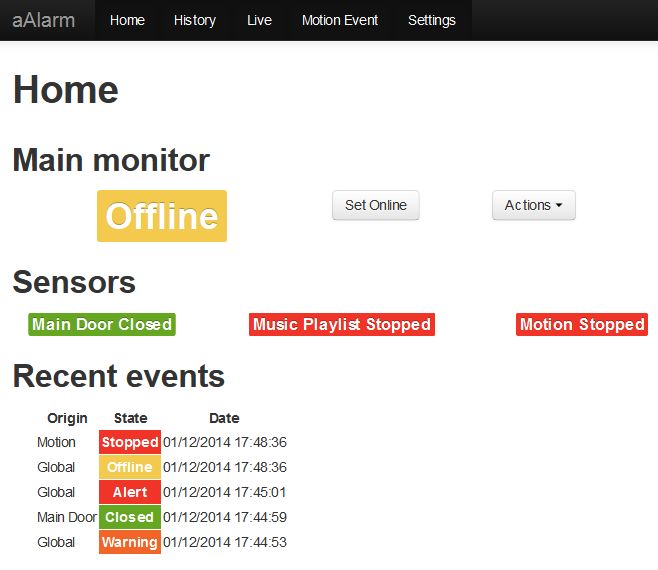
Web monitoring interface
-
Email alerts
-
Events history
-
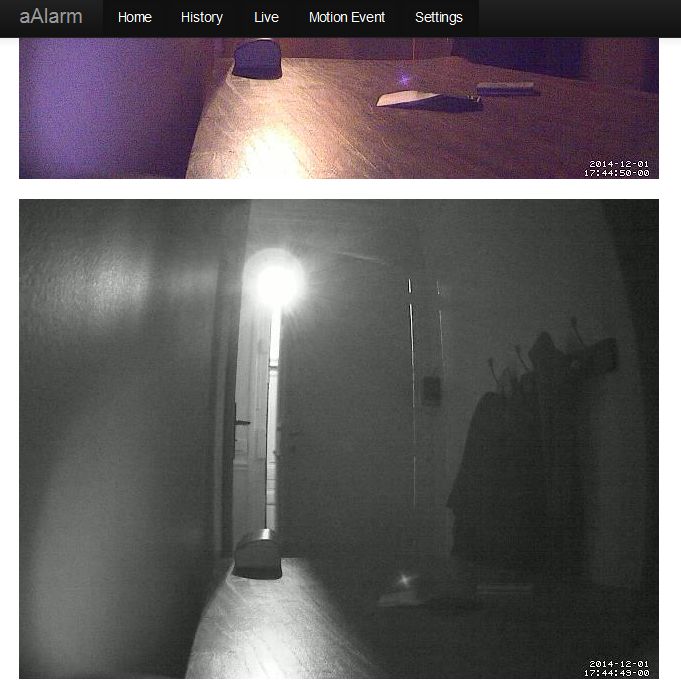
Motion detection camera (optionnal)
-
Intrusion event linked to recorded motion detections
-
Presence simulator (playing mp3’s) (Optionnal)
-
Keypad to activate / deactivate alarm (Optionnal)
-
Self-powered siren (Optionnal)
Some pictures
Axis 207W is switching from B&W to colour accordingly to brighness
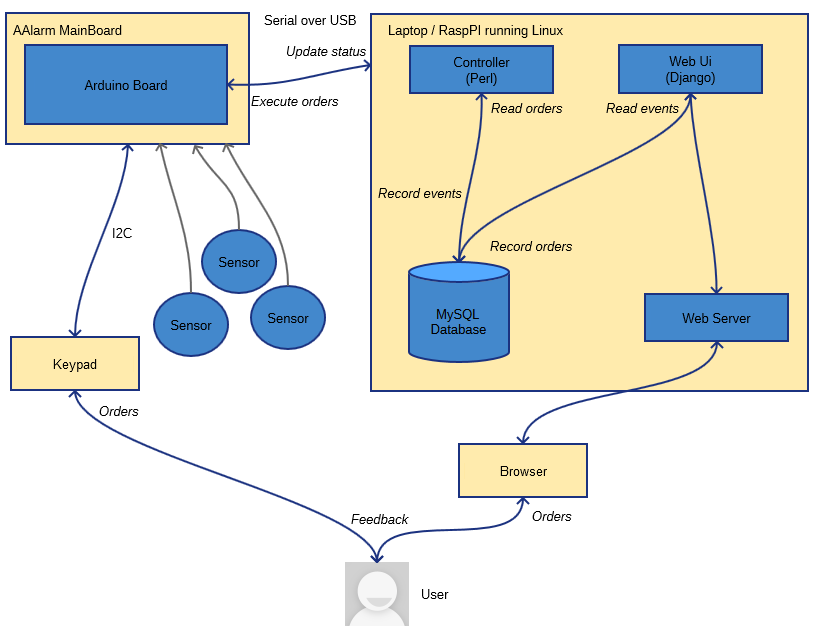
The big picture
Hardware requirements
|
rPi board is replaceable by a standard computer. Any computer that could run Debian should fit. I’ve created a custom shield to connect sensors, keypad and siren : It’s not mandatory. Sensors can be directly connected to Arduino I/O pins. |
Here’s a list of required hardware :
-
Arduino Board : I’m using a Arduino Uno version, other versions should work.
-
RaspberryPi : I’m using model Raspberry model B with Ethernet connector. Model B+ should perfectly fit. Don’t forget suitable power adapter and a SD Card. RaspberryPi Model B+ page
-
A camera (Optionnal) : USB or Network. Must be compatible with Motion.
-
Keypad control I2C board (Optionnal) : See Schematics.
-
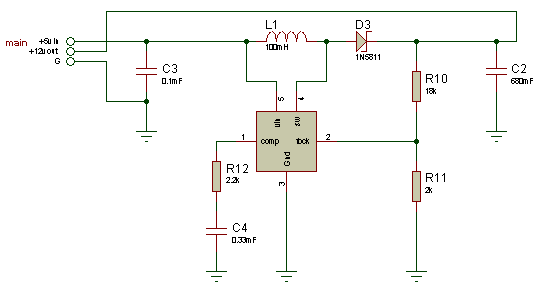
Siren control board (Optionnal) : See Schematics
-
An amplified speaker (Optionnal)
Depending on what you need to monitor, you’ll need some sensors.
I’m currently using a magnetic door sensor like this one on Amazon. Note that it acts like a switch. I’m used to monitor my door this way.
Arduino connections
Custom shield
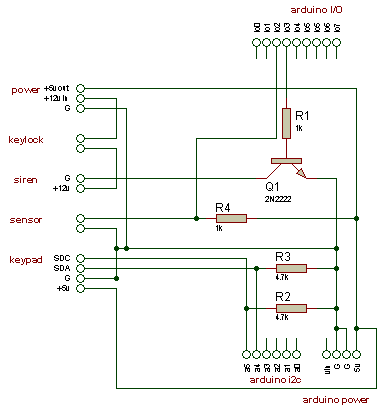
Keypad (Optionnal)
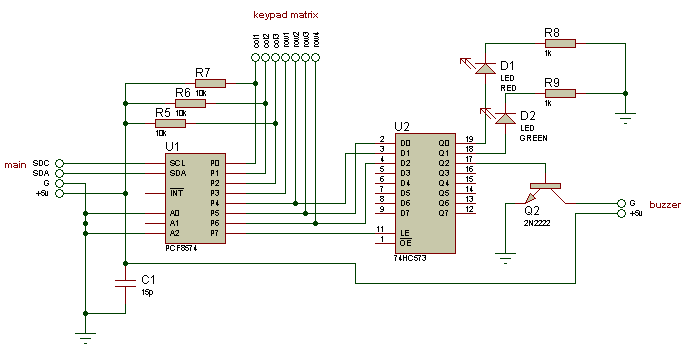
Siren board (Optionnal)
Software
You could find the whole project at Github aAlarm Repository.
This software is composed of :
-
Arduino software (ino folder) : Controls and monitor Arduino I/Os.
-
alarmSerialController (pl folder) : Written in Perl. Controls Arduino through USB as a serial device.
-
Django Web Ui (webDj folder) : Allows to remotly monitor aAlarm.
-
Shell Scripts (sh folder) : Start and stop aAlarm programs.
Install aAlarm
Prepare Arduino
Use Arduino IDE to upload the program into your Arduino Board.
Prepare RaspberryPi
You’ll need to install Raspbian.
The easiest alternative is to use Noobs.
For this step, you’ll need to connect a monitor and a keyboard to the RaspberryPi board. You wont need it later.
After installation, login through SSH.
(In most cases you’ll need to install ssd with the following command : apt-get install ssh or use raspi-config).
Install aAlarm
I’ve created a Debian package for an easier installation.
Logon to your RaspberryPi, then, download and install package.
I’m sorry, I currently do not have an apt-source. To satisfies dependancies, you’ll need a little trick.
Pay attention when you’ll be prompted with mysql root password.
wget https://github.com/kemkem/blogFiles/raw/master/aalarm_1.0.0.deb

#ensure apt index is up-to-date
sudo apt-get update

#must end with some dependancies errors
sudo dpkg -i aalarm_package.deb

#install dependancies...
sudo apt-get -f install

#install package
sudo dpkg -i aalarm_package.deb
Install third party mail software
If you’re planning to use email alerts, install your favorite mailer.
I’m using ssmtp with allows you to send emails using gmail. It’s really convenient and easy to use.
After installing the package, check this page to configure it.
apt-get install ssmtpInstall third party mp3 player software
If you’re planning to use the presence simulator, install your favorite mp3 player.
I’m using mpg123.
You’ll need to edit "/usr/share/sh/*Playlist.sh" in case of other player installed.
apt-get install mpg123Configure Motion
This part must be tricky, and depends on which camera model you’re using.
I suggest to check the Motion Guide and test everything is working smoothly.
Edit motion config sudo vi /etc/motion/motion.conf.
#deamon : let motion run in deamon mode

daemon on

#videodevice : choose video device (if you're using an USB cam, this must be the place !)

videodevice /dev/video0

#netcam_url indicates where motion gets images from a network camera

netcam_url //http://CAM_IP/jpg/image.jpg

#netcam_userpass if required. it must be for security reasons !

netcam_userpass CAMUSER:CAMPASSWD

#target_dir : indicates where to store motion images (in Django static dir)

target_dir /usr/share/aalarm/webDj/static/motion

#Miniserver (use for live view through java applet)

webcam_port 8081

#sql_query : modified according our datamodel

sql_query insert into aalarm_security(camera, filename, frame, file_type, time_stamp, text_event) values('%t', '%f', '%q', '%n', '%Y-%m-%d %T', '%C')

#mysql auth

mysql_db DBNAME

mysql_user DBLOGIN

mysql_password DBPASSWD
Configuring aAlarm
Configuring MySQL
We need to create a database and grant a specific user some permissions to access it.
Mind the database DBNAME / DBLOGIN / DBPASSWD, we’ll need them later.
Use mysql client mysql -u root -p.
create database djaalarm;
grant usage on *.* to DBLOGIN@localhost identified by 'DBPASSWD';
grant all privileges on DBNAME.* to DBLOGIN@localhost;
Prepare Database
Some data is needed by alarmSerialController in this database.
Use mysql client mysql -u root -p.
#You'll be prompted for your DBPASSWD
mysql -u DBLOGIN -p --database=DBNAME < /usr/share/aalarm/sql/create_tables.sql

mysql -u DBLOGIN -p --database=DBNAME < /usr/share/aalarm/sql/custom_init_tables.sql
Configuring Linux User
In order to access the Arduino through USB, your user must be in dialout group with sudo usermod -a -G dialout USER
Configuring Django
Edit settings.py and modify DBNAME / DBLOGIN / DBPASSWD according your previous setup.
sudo vi /usr/share/webDj/djangoAAlarm/settings.py.dist
Then run Django database sync tool
Pay attention when you’ll be prompted with Django admin password.
sudo /usr/share/webDj/manage.py syncdb
Configuring Controller
Edit aalarm.conf and modify DBNAME / DBLOGIN / DBPASSWD
sudo vi /etc/aalarm.conf
Then initiate parameters into Database
/usr/share/aalarm/pl/alarmSerialController.pl initdb debug
Using aAlarm
Starting (and stopping) the service
(I will soon create more convenient init.d scripts…)
Logon to your rPi and run the following command to start aAlarm :
startAAlarmServices.sh
run the following command to stop aAlarm :
stopAAlarmServices.sh
Connect to Web UI for the first time
Open a web browser and open this URL : http://YOUR_RPI_IP:8000/admin/auth/user/
Then create a standard user using add user link on the top right.
You’ll be prompted with your Django login / passwd.
Then logout, and connect to aAlarm using this URL : http://YOUR_RPI_IP:8000/aalarm/